Categories
Uncategorized

Awesome New Way to Check Free Disk Space on Mac Lion

Mac OS X Lion includes a awesome new way to check the free space on a disc. I stumbled across this feature by accident. Besides showing the size of the disk and how much free space it has, this method shows graphically how much space is being used for different types of files.
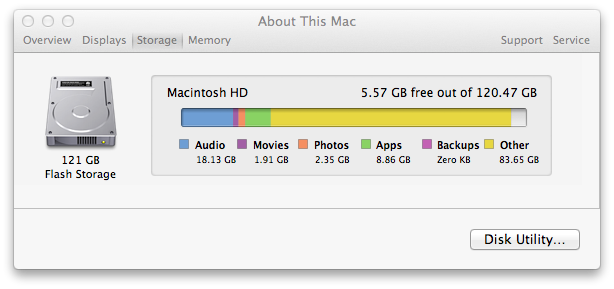
Screenshot of Checking Disk Size and Free Disk Space on OS X Lion using About This Mac
The new way to check free disk space on OS X Lion

Get the Size and Free Space of the Mac’s Hard Disk on Lion

Here’s how you show your disk’s free space on OSX 10.7, step-by-step:

  1. Go to the Apple menu. Click the Apple icon at the top-left of the screen.
  2.  Click About This Mac at the top of the menu.
    The About This Mac window will appear.
  3. Click the More Info… button.
    A new About This Mac window will appear with a picture of your Mac.
  4. Click the word Storage towards the top left of the window.
  5. An attractive window showing your free disk space will appear.
    The display includes how much disk space is used for each of your music, movies, photos, apps, and backup files.

This feature works with your main Mac hard disc, usually called “Macintosh HD“. It does not work with removable hard drives. It might work with other permanently connected hard disks installed in your Mac – I haven’t tested this yet.

Get the Size of a Removable Hard Disk with Mac OS X Lion

The method above doesn’t work for removable hard drives on Lion. The Snow Leopard method I use doesn’t work either – in Lion, disks aren’t listed on the side of a Finder window as they are in Snow Leopard.
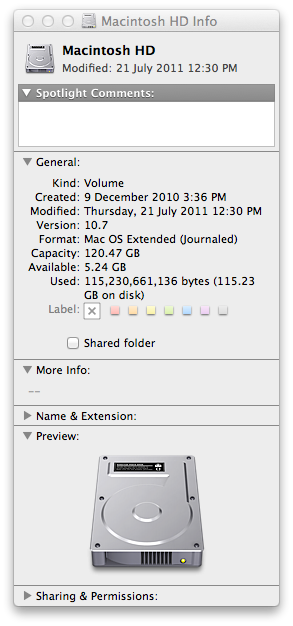
Image of a Get Info window, used tind out the size and free space for a disk on Mac OS X 10.7 Lion using the Finder's Get Info command
Get a disk's size and free space using "Get Info" on Mac OS X Lion

Here’s an alternative method to find a disk’s size and free space on Lion that that works for removable disks and network drives:

  1. Go to Finder: Click the smiley blue Mac face at the left end of the Dock. The dock is the bar of icons, usually at the bottom of the screen, used to start programs.
  2. Click Go at the top of the screen to open the Go menu. Click the menu item “Computer“.
  3. A list of disks connected to your computer will appear in a window, with some other items like “Network“.
  4. Click the disk once whose size or free space you want to find out. Just click it once, not a double click.
  5. Click the File menu at the top left of the screen. Click the Get Info menu item.
  6. A window will appear with information about the disk. Look at the “Capacity” field for the disk’s size, and the “Available” field for how much free space the disk has.

Thank You!

If you have a question or comment about check disk size and free space on Mac, please use the comment form at the bottom of the page.

If you found this article useful, please link to it from your website or blog, click the Like or +1 button to help others find this page.

Thanks for visiting!
Categories
Uncategorized

Lion Upgrade Killed My PHP Website – and How I Fixed It

After installing Mac OS X Lion, I found the PHP site I use for development stopped working. I’d just get an empty webpage when I went to the website. It’s a WordPress site, using both PHP and MySQL. Lion ships with PHP 5.3.6, the latest production release of PHP.

In WordPress’s wp-config.php file, I set the WP_DEBUG constant to true to see what is going on:

define('WP_DEBUG', true);

It turns out WordPress / PHP could not connect to the MySQL database on my Mac running Lion:

Warning: mysql_connect() [function.mysql-connect]: [2002]
No such file or directory
(trying to connect via unix:///var/mysql/mysql.sock)
in /Users/taz/Sites/smartwebdeveloper/wp-includes/wp-db.php
on line 1036

I checked my Apache config. The Lion upgrade process left my Apache config alone, so my virtual host was still intact and working. It put a new httpd.conf.default in place in case I Apache wanted to use an more up to date Apache configuration. Happily it had left my configuration that enabled the PHP 5 module in place.

I remembered that Mac OS X Server’s MySQL install puts the socket for communicating with MySQL at /var/mysql/mysql.sock. The install of MySQL I’m using, from mysql.com, in order to not conflict with Apple’s MySQL, puts the socket at /tmp/mysql.sock. I’d configured PHP back when I was using Snow Leopard to talk to the MySQL socket in /tmp.

I created a quick PHP file calling the phpinfo() function in my website’s home directory to check the PHP configuration:

<?php phpinfo();

I went to that webpage through the web and found, sure enough that all three PHP MySQL extensions – MySQL, MySQLi and PDO MySQL were all expecting the MySQL socket to be in /var/mysql.

I checked the PHP configuration directory /etc/php. The reason why PHP wasn’t working properly (i.e. connecting to MySQL) was OS X Lion install had moved my PHP configuration file – php.ini – out of the way:

tazair:smartwebdeveloper taz$ ls -l /etc/php*
-rw-r--r--  1 root  wheel  69302 20 Feb 00:42 /etc/php.ini-5.2-previous
-r--r--r--  1 root  wheel  69337 21 Jul 12:20 /etc/php.ini.default
-r--r--r--  1 root  wheel  69060 16 Dec  2010 /etc/php.ini.default-5.2-previous

Lion renamed my php.ini file to /etc/php.ini-5.2-previous, and put a new sample PHP configuration file, /etc/php.ini.default. It makes sense to do this: Lion uses PHP 5.3 which has new options and defaults, compared to PHP 5.2 used on Snow Leopard.

I copied the example PHP configuration into place:

sudo cp /etc/php.ini.default /etc/php.ini

I edited the new PHP configuration to update all references to /var/mysql/mysql.sock to /tmp/mysql.sock. Before editing php.ini:

tazair:~ taz$ grep .default_socket /etc/php.ini
pdo_mysql.default_socket=/var/mysql/mysql.sock
mysql.default_socket = /var/mysql/mysql.sock
mysqli.default_socket = /var/mysql/mysql.sock

After editing php.ini:

tazair:~ taz$ grep .default_socket /etc/php.ini
pdo_mysql.default_socket=/tmp/mysql.sock
mysql.default_socket = /tmp/mysql.sock
mysqli.default_socket = /tmp/mysql.sock

I also enabled two of the three MySQL extensions, which were configured off in the default php.ini in the Lion install. WordPress perhaps only needed one of three MySQL extensions:

tazair:~ taz$ grep mysql /etc/php.ini|grep ext
extension=php_mysql.dll
extension=php_mysqli.dll
;extension=php_pdo_mysql.dll

I needed to restart Apache for it to pickup the new configuration:

tazair:~ taz$ sudo apachectl restart

Happy days! PHP could talk to MySQL, and my WordPress site was working on OSX Lion.

By the way, if you need mycrypt working with PHP on Lion, Michael Gracie‘s written an excellent post on how to do this.

If you have any questions or comments about the process above, please leave a comment. If this article helped you, please click the Tweet or +1 buttons. Thanks for visiting!

Categories
Uncategorized

Release Date for Mac OS X Lion

When is Mac OS X Lion due out? Mac OS X 10.7 – codenamed “Lion”, includes 250 new features, such as full screen apps and Mission Control.

Mac OSX 10.7 Lion is available now. It was released 20 July 2011. There were reports, for example from the OS X Daily website, that Lion will be available as early as 14 July.

Lion is only be available from the Mac App Store. The cost in the U.S.A. is USD$29.99. In Australia the cost is AUD$31.99.

To upgrade, you need:

  1. Mac OS X Snow Leopard installed – at least version 10.6.6. (The current Snow Leopard release is 10.6.8).
  2. An Intel Core 2 Duo or later CPU in your Mac – note the ‘2’. Macs with Core Duo, G3, G4 or G5 chips can’t be upgraded. Intel i3, i5, i7 or Xeon chips will be fine.
  3. 2GB+ of memory.
  4. 4GB of free hard disk space. (The Apple App Store says the download is 3.49GB.)

AirDrop is one of the features that I’m really looking forward to. It let’s MacBooks running Lion very easily and securely share files – without having to join the same wireless network, and all the usual messing ’round.

For more information on Lion, see Mac OS X Lion: Useful Features, Compatibility, Upgrade Requirements, Install Time.

If you found this article useful, please click the +1 or Tweet button.

Categories
Uncategorized

Force Any Mac App to Quit using Only Keyboard Shortcuts

This article shows how to Force Quit any Mac application using only keyboard shortcuts. Any application can be quit – not just the front-most app. This is the fastest way to select any Mac app to terminate it immediately.

These instructions work for Mac OS X 10.6 Snow Leopard and Mac OS X 10.5 Leopard, and – I’ve just tested – I can confirm it works on Mac OS X 10.7 Lion as well.

Keyboard shortcuts can be necessary to force an app to exit, as a hung app may prevent access to the force quit function through the Apple menu.

Here’s the process to force quit a frozen app on OSX using only keyboard shortcuts:

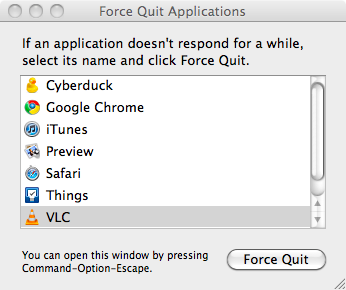
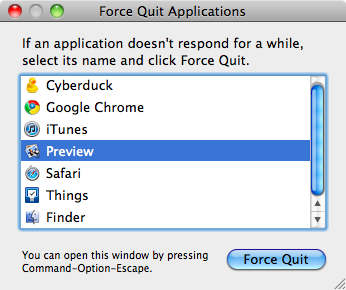
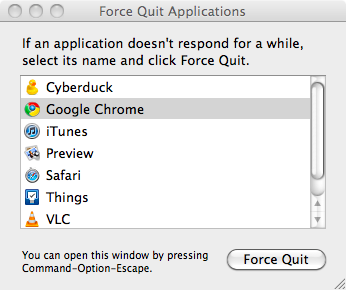
  1. Press the force quit keyboard shortcut Command-Option-Esc: Hold down the Command and Option keys and press the Esc (escape) key. Release all the keys. A window titled Force Quit Applicationsshould appear, like this:

    The Force Quit Applications Window on Mac OS X 10.6
    The Force Quit Applications Window on Mac OS X 10.6
  2. Select the app: Use the up and down arrow keys to select (highlight) the frozen app you want to exit. Here we select VLC:

    The Force Quit window with VLC now selected
    The Force Quit window with VLC now selected
  3. Press Return:This will choose the highlighted app to kill. A confirmation window will appear:

    Confirmation Window: Do you want to force VLC to quit?
    Do you want to force VLC to quit?
  4. Press Return again: This is equivalent to pressing the Force Quit button. The kills the app, in our case VLC. All being well, your unresponsive Mac app has now been terminated. Notice VLC is no longer in the list of apps that can be quit:

    The window after VLC has been Force Quit
    The window after VLC has been Force Quit
  5. Press Esc: Pressing the escape key will cause the Force Quit Applications to close.

If the Mac app you want to force to quit at the front, i.e. it’s name shows in the menu bar, there’s a keyboard shortcut that can kill it in one step. To see how, visit Force Quit a Mac App Instantly with a Single Keyboard Shortcut.

Comments, improvements, feedback and thanks welcome! Please use the form below.

Categories
Uncategorized

Force Quit a Mac App Instantly with One Keyboard Shortcut

This article shows how to Force Quit the front-most Mac application immediately with a single keyboard shortcut. This little-known keyboard shortcut is the easiest, fastest and best way to force a Mac application to quit. Yes – it works on Lion.

This shortcut works for Mac OS X 10.6 Snow Leopard and Mac OS X 10.5 Leopard. The shortcut also works for Mac OS X 10.7 Lion – I’ve tested it! This key combination does not work for Mac OSX 10.4 and earlier, which probably explains why it’s not well known.

What is Force Quit?

The normal ways to quit a Mac application are to choose Quit from the menu named for the application (e.g. Word, Chrome, VLC, Mail) or to press the keyboard shortcut to Quit, which is Command-Q. Force Quit is a Mac feature to force a Mac program to exit when it won’t respond to these normal ways to quit.

Why is Force Quit Useful?

Force quitting a hung application is useful to restart the app in order to be able to use it again. For example, if Mac Mail locks up while retrieving mail, you can terminate it, and start it again.

Force quit is even more useful when a frozen app stops access to the Finder and other applications, so that you can’t use your Mac. In the situation, that Mac seems frozen. Force quitting the hung app can be necessary to be able to use your Mac again.

An unresponsive app can prevent access to the Apple manu, so that knowing the keyboard shortcut to force quit an app is sometimes the only way to be regain control of your Mac.

Warnings for Force Quit

If you force quit an application, you will probably lose any changes you’ve made in that app that you haven’t saved. (With Microsoft Office, you might get an autosave.) Try quitting with the Command-Q key combination first.

What is the Key Combination to Force Quit a Mac App?

This keyboard shortcut will kill the front-most Mac app, which is usually the app you want to stop. If you want to stop an application which is not at the front, see Force Any Mac App to Quit using Only Keyboard Shortcuts.

The keyboard shortcut to force quit the front-most Mac app is to press and hold Command-Option-Shift-Escape until the app exits. There is around a three second delay until the Mac kills the app, to prevent this feature being applied accidentally.

How to Use the Force Quit Keyboard Shortcut, Step by Step

If you’re unused to complex key combinations, here’s how to do it in steps:

  1. Hold down the Command key.
  2. Add holding the Option key with another finger on the same hand.
  3. Add holding the Shift key with another finger on the same hand.
  4. With these keys held down with one hand, use your other hand hold the Escape (Esc) key until the foreground app exits. This should take about three seconds.
  5. Release all the keys.

Information sourced from http://support.apple.com/kb/ht3411.

Questions, comments or feedback? Please leave a comment below.

Categories
Uncategorized

Httpd.conf Location on Mac on Lion and Snow Leopard

Looking for httpd.conf on Mac? Httpd.conf is the main Apache web server configuration file. This article covers where to find httpd.conf on OS X.

On Mac, httpd.conf is located in the directory /etc/apache2. This location was checked on Mac OS X Lion 10.7, Mac OS X 10.6 Snow Leopard (10.6.7, 10.6.8).

Here’s is the full path to the httpd.conf file:

/etc/apache2/httpd.conf

If you open httpd.conf with TextEdit, you won’t be able to save the file. Httpd.conf is protected from editing by OSX, so that people don’t inadvertently damage or delete their web server config, or open up security holes. See Easily Edit Httpd.conf on Mac for how to bypass this security.

See Apache’s official configuration documentation for more information on configuring Apache.

If you’re looking for the location of the Apache logs on Mac (the access log and error log), they’re in this directory:

/var/log/apache2
Categories
Uncategorized

How to Easily Edit Httpd.conf on Mac Lion or Snow Leopard

Httpd.conf is normally protected from editing by Mac OS X. This article shows the easiest way to overcome this security and edit httpd.conf.

Theses editing methods have been tested on Mac OS X 10.6 Snow Leopard (10.6.7, 10.6.8) and Mac OS X Lion 10.7.

Edit Httpd.conf on Mac OS X 10.6 Snow Leopard

If you’re running Snow Leopard, you’ve got it easy! You can edit httpd.conf using the TextEdit app. This method does not work for Lion. If you’re using Lion, go on to the next section.

If you open the httpd.conf file with TextEdit normally, you won’t be able to save. You can’t save httpd.conf because Mac OS X protects httpd.conf, so that people don’t accidentally damage or delete their web server config, or open up security holes.

To edit httpd.conf, you will need superuser or root privileges.

To edit httpd.conf:

  1. Open the Terminal application.
    It’s in the Utilities folder, inside the Applications folder.
  2. Type in the command below.
    It will prompt you with “Password:” on the next line.
  3. Enter your Mac password.
    The TextEdit application will start with httpd.conf loaded.
  4. Edit httpd.conf.
  5. Save httpd.conf.

The command to enter is:

sudo open /Applications/TextEdit.app \ 
--args /etc/apache2/httpd.conf

This method doesn’t work on Lion. Lion has increased security over Snow Leopard. On Lion, opening TextEdit with sudo doesn’t confer enough privileges to TextEdit to open httpd.conf. If I find a workaround to edit httpd.conf in TextEdit on Lion, I’ll post it here. If you know a workaround for Lion, please comment below.

Edit Httpd.conf on Mac OS X 10.7 Lion

Since we can’t edit httpd.conf with TextEdit or other apps on Lion due to tighter security, our next best bet is the simple terminal-based text editor that ships with OS X, pico.

Here’s how to edit httpd.conf with pico:

sudo pico /etc/apache2/httpd.conf

To make life easy, Pico displays a list of keyboard commands at the bottom of the screen, such as ^X Exit. It’s important to know that the hat character “^” means the control key. So ^X is the same as Control-X, which means hold down the control key and press and release the X key.

If your familiar with the vi text editor, you could use that instead.

Let me know how you go!

Categories
Uncategorized

Change Your Mac’s Name on Lion or Snow Leopard

Here is how to change your Mac’s name. This method works on both OS X Lion and Snow Leopard.

Your Mac’s computer name is used to identify it on the network. By default, other computers will see your Mac as something like “Tasman Hayes’s MacBook Air“. I like to change it to something simple like “tazair“.

To change the Mac’s name:

  1. Click the Apple menu at the top and choose System Preferences…
  2. Click the Sharing icon. (It’s in the Internet & Wireless section, third row down.)
  3. In the Computer Name field, type your Mac’s new name.
  4. Click the red cross in the top left corner of the window. This will close the Sharing preferences window and apply your Mac name change.

Did you know in geek speak the Mac computer name is called a host name, or hostname?This is because Mac OSX’s was developed in part from Unix, which uses this term.

Tested on Mac OS X Lion 10.7 and Mac OS X Snow Leopard 10.6 (10.6.7, 10.6.8).