Categories
Uncategorized

MacBook Air & Pro External Displays – Tips for Buying & Using

Buying an external display for a MacBook Air or MacBook Pro? Here’s some quick buying tips, including how to find a cheap, thin, full HD screen for $152.

Already got an external screen? There’s tips for the best way to use your external monitor with your MacBook.

Most of these tips also apply for getting a main display for the Mac Pro and Mac Mini, as well as getting a second iMac external display. Read on for tips, and a bit about Apple’s new Thunderbolt Display.

Tips for Buying an External Display for a MacBook Pro or MacBook Air

  1. Get a wide screen. They’re great for wide content, like video or spreadsheets. They’re also good for viewing two windows side-by-side on one screen. Luckily, widescreens are pretty much standard now.
  2. Get a full HD (1080p) screen instead of a lower resolution screen. Lots of pixels means seeing lots of content with good detail. Less scrolling to do. More context. Full HD screens (1920 x 1080) are now cheap – $170 for an entry-level display.
  3. Buy around a 24 inch size. If you get a smaller HD screen, it may be hard to read. I find 30 inch and larger screens too big to take in – it’s like being at an IMAX, I’m moving my head around excessively to take in the contents of the screen. With a 30 inch plus screen, I also feel washed out from all the light blasting into my eyes all day.
  4. Strongly prefer screens with a DVI port. Other ports will work (VGA and HDMI), but DVI was designed for high resolution digital computer monitors. If the screen only has a VGA port, it’s probably pretty old technology. If the display only has HDMI ports, the display is intended as TV – it may be fine, but it probably wasn’t designed to be a computer monitor, to be used close up, for a whole day. To me, TVs have a different quality to their image – I haven’t asked a tech about why – whether the panel, refresh rate, viewing angles, color range or image processing is different between an LCD monitor and an LCD TV.
  5. Make sure the screen is bright enough for you. Nearly all screens have sufficient brightness now, but there are still cheap screens with low brightness and contrast. A dull screen makes you stare harder to perceive everything.
  6. If you’re collaborating with others, consider screens with wider viewing angles. Cheap screens can become hard to see as soon as you stand up (the panel’s vertical viewing range) or move left or right (the panel’s horizontal viewing range). The more expensive the screen, generally the further you can move and still see the image properly. This means others can sit or stand beside you, and check out your project.
  7. Try out higher-grade screens. More expensive screens have more accurate color (gamut), they’re brighter, have better contrast ratios, faster response, and have HDMI interfaces (e.g. for a Blueray player). Better screens do “feel” better to work off – there’s a crispness that makes them easy to read, yet not tiring. Sometimes the quality difference is only obvious side-by-side: you could check out a few external screens at a computer store.
  8. Buy a Mini DisplayPort to DVI Adapter. Apple sell them ($29). You’ll need it to connect your MacBook Air or Pro to the external display.

At home, I was on a budget and got an AOC RAZOR LED e2343F 23.0″ Full HD LED Monitor Ultra-slim 12mm, LED Panel & Backlight for $169. (This was in Australia from i‑Tech.) I was shocked by how good the image was for the price. It’s light & slim. The white base looks strange with the black bezel. At the time of writing it’s available in the U.S. for $152, according to Google Product Search.

At work, I have a LG display. It’s more expensive than the AOC screen ($250 vs $169), and a bit bigger (24 inch vs 23 inch). For me, the LG feels like just the right size. The LG can also rotate in its stand to a vertical orientation (i.e. portrait/tallscreen instead of landscape/widescreen). Portrait mode is useful for word processing , or designing pages for print, where you can see a whole page at a time. If you’d like the LG’s product code, leave a comment below, and I’ll look it up.

Tips for Using External Screens

  1. Turn the screen brightness down to where your eyes feel relaxed. It took me 28 years to work this out! Over bright screens wear me out. I can feel my eyes straining. Make the screen bright enough so the color is good, and text is readable, yet soft enough that your eyes don’t feel achy.
  2. Have a main screen directly in front of you, with a keyboard and trackpad in front of it. I’ve run off two screen systems for years. When I sit in the middle of two screens, my neck is either twisted left or right all day. Not so good. I’ve found it works better to have a a big screen directly in front of me, with windows I look at 90% of the time. I then put the smaller screen to one side, with windows that I look at less often (e.g. email or a webpage I have open to refer to). Since the laptop will be the smaller screen, this means springing for an external keyboard and mouse. Worth it. If you use the wireless Apple keyboard and trackpad or mouse, it’s easier to take your MacBook away – two less cables to unplug.
  3. Three screens may not be heaven. I’ve ran off three screens for about six months. I slowly noticed three screens felt crowded and that I got tired from three screens blasting photons at me. Dropping back to a single big main screen front and center has felt much better, and I’ve got more energy at the end of the day.
  4. Try one big screen, instead of a big screen plus laptop on the side. If it feels better with just one big screen, you can close your MacBook Pro or Air and it will keep on running (instead of sleeping), provided your external monitor, keyboard and mouse are connected. Ah, the simple life!

Apple Thunderbolt Display

Apple has offered a fairly giant Mac display display for awhile, both as a separate screen – the 27 inch Cinema Display, and well as built in to the 27 inch iMac. Now the Cinema Display has been upgraded to the 27 inch Thunderbolt Display.

Thunderbolt technology uses the video cable to send high speed data to external devices as well as sending video to the monitor. The Thunderbolt Display has a Gigabit Ethernet port, a few USB ports, a Firewire port, and a webcam, and they all come courtesy of plugging in one tiny mini DisplayPort connector to your Mac Pro or Air. You can daisy chain more Thunderbolt devices onto the monitor, like disk arrays.

Thunderbolt turns the tiny “Mini DisplayPort” connector on the current MacBook Air and MacBook Pro models into a docking station connector. You can flounce around with your tiny two pound, 11 inch MacBook Air. Then get to the office (or come home), plug in one tiny cable, and suddenly that tiny laptop has become a big powerful computer workstation, with a big display, fast networking and large capacity disk storage. It makes the Thunderbolt connector the modern day equivalent of a docking station, but way more convenient.

I suspect it’s the way computing will go: light, small, fast, thin laptops. When you need big screens and storage, you just plug in one cable. Thunderbolt, made by Intel, is finding its way on Windows PCs and laptops in 2012. One day day you’ll probably be able to just plug your iPad or iPhone into a Thunderbolt Display to get a full sized workstation.

I tried out the Thunderbolt Display’s predecessor, the 27″ Cinema Display. It is a gorgeous display. It has the same crazy better-than-HD resolution: 2560 by 1440 pixels. (Full HD is 1920 by 1080 pixels.) It’s pretty big – I don’t know if I could live with the “IMAX head swivel” effect, but perhaps it would work if I put a big distance between the monitor and I – I’d need a deep desk. I’d really like to try one out for awhile. (If you have one, please comment below to let us know how you find it!)

I mention the Thunderbolt Display in case you have the money, appreciate the quality, and it’s not too big for you. I’ve tested the new MacBook Air running a Cinema Display, which has similar screen specifications and video technology to the Thunderbolt display – you can see the video at MacBook Air external display.

Thanks!

Thanks for visiting Mac Crazy! Do you have any tips, questions or comments about using external monitors with MacBooks? If so, please use the comment box at the bottom of the page.

If you found this article useful, please help share it – please click the +1, Like or Share buttons below. It just takes a moment! Thank you!

Categories
Uncategorized

How to Brighten and Dim a MacBook Screen – with HD Video

Is your MacBook screen dim? Or too bright? Using both photos and video, this article shows you how to increase the brightness of your MacBook screen and how to dim it. The article also explains why the MacBook’s display will sometimes brighten or dim automatically.

This article is useful for people new to Mac. It’s also a useful article to send to friends if they’re complaining their screen is too dim or too bright.

The high-definition video above  shows how to make your MacBook’s screen brighter and dimmer, and what it looks like when the brightness keys are working properly. Scroll down for photos, if that works better for you.

MacBook Screen Dark

This article started with an email from my mother:

Taz the screen on my putor is very dull like someone turned the dimmer down. Is there something I can do to brighten it up?
xx

I was worried something was wrong with my mom’s Mac, particularly the display’s backlight. Then I realised I’d never taught my mother how to increase the brightness on her MacBook’s screen. Perhaps her MacBook display had dimmed for some reason, and she didn’t know how to make it brighter.

I emailed my mom back:

Look at the top-row of the keys on your keyboard.

Towards the left, probably the second or third keys, there a two keys with pictures of suns on them.

A sun drawn like a circle with lines radiating out from it.

There’s a key with a small sun.
Then the next key has a bigger sun.

Press the key with the big sun.

Does that make the screen brighter?

Could mum’s problem be that simple? I waited. She wrote back:

You are a clever boy, obviously my brains. My sun keys are on the left and it worked beautifully. Thanks Taz.

Excellent! Problem fixed. I then got to thinking: “Perhaps other people haven’t been introduced to the Mac’s sun keys.” So I wrote this article.

The Mac Brightness Keys

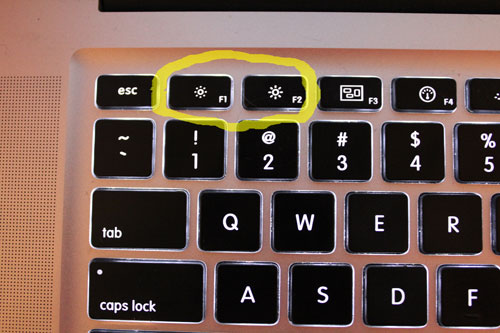
Close up photo of keys to brighten and dim MacBook Pro 15 inch screen

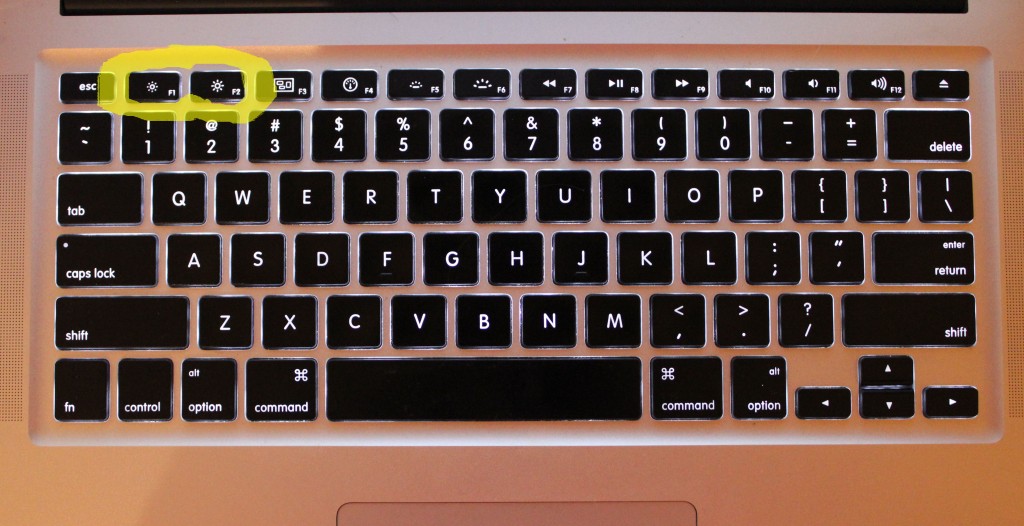
Brighten and dim your MacBook’s screen – the little sun (dim) and big sun (brighten)

Press the “big sun” key to make your screen brighter. Press the “small sun” key to dim the MacBook screen. When you change the brightness using the “sun keys”, the brightness level is briefly shown on screen. (You can see this in the video.)

What Macs do the Brightness Keys Work On?

The brightness keys works on the MacBook, MacBook Pro, MacBook Air and the iMac. It also works with any version of the Mac operating system, Mac OS X, such as Snow Leopard or Lion 10.7.

Make the MacBook Pro Screen Brighter

This photos shows where to find the brightness keys on a MacBook Pro. It’s a MacBook Pro 15 inch model pictured here. I’ve circled the brightness keys in yellow. The little sun and big sun keys, at the top of the keyboard, are only half the height of regular keys:

Here’s a close up:

Brighten a Dim MacBook Air Screen

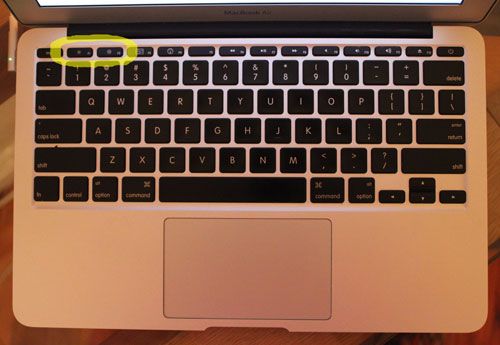
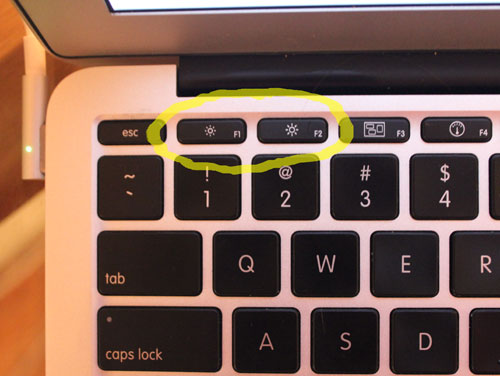
The brightness keys on a MacBook Air are in the same position as the MacBook Pro. See the keys circled in yellow here on an 11 inch MacBook Air:

The top row of keys, often called function keys, is particularly narrow on the MacBook Air. They’re even smaller than on the MacBook Pro, which can make them hard to spot. Here’s a close up of the screen brighten & darken keys on the MacAir:

Automatic Screen Brightness Changes – Ambient Light

MacBooks include a ambient light sensor. The sensor detects how it bright it is where you’re using your Mac.

If the room gets brighter, the Mac will automatically brighten the screen to maintain the screen’s readability in the brighter light. If the room gets darker, the screen will darken so the screen isn’t overly bright. This reduces eye strain, and saves power.

To see this working, take your MacBook to a darker room. Look at your Mac’s screen while you switch the light on, wait ten seconds, then off. You should see that when the change in the room’s light level happens, the Mac smoothly adjusts the display’s brightness. The brightness changes almost immediately, taking about two seconds to complete.

Automatic Screen Dimming – Idle Mac

You may notice that your screen dims considerably after a couple of minutes of not interacting with your Mac. By “not interacting” I mean not touching the trackpad or keyboard. This is to conserve power. It’s normal MacBook behaviour.

The Brightness Keys and External Screens

This brightness keys do not work for third party external displays. It’s possible, with Apple’s cleverness, the keys could work with the Apple LED Cinema Display and the Apple Thunderbolt Display connected as the main monitor for a Mac Pro or Mac Mini. If you’ve tried this and can tell us if it works, please leave a comment below.

Conclusion

Did this article help you dim or brighten your MacBook’s screen? If it did, please share the article by clicking on the Like, +1 or Tweet buttons. It takes just a moment – thanks!

If you still have unanswered questions or have suggestions to improve this article, please leave a comment below. Find more interesting topics and articles at the bottom of this page.

Categories
Uncategorized

What’s the Best MacBook for Making Music?

Updated January 2012: What’s the best MacBook for making music? Is it the MacBook Pro or MacBook Air? What size is best? 11 inch, 13 inch, 15 inch or 17 inch?

This article considers Mac OS X Lion and the latest 2011 / 2012 MacBook Air models with faster Intel Core i5 & i7 processors.

If your planning to buy a Mac laptop for music, there’s some links at the end of the article where you can save some money.

Which MacBook for Making Music? Things to Consider

Here are questions to consider to see which would be the best MacBook music rig:

  1. Do you want a new or secondhand Mac Book?
  2. Do you want the “best possible setup” (you’re happy to spend a lot) or a “good enough setup” (spend just enough money to get the job done)?
  3. Do you know what music software you’ll use? (e.g. Logic, ProTools, Cubase, Live, GarageBand, Reaktor, Kontakt, Traktor, Reason, Sibelius, Vienna Symphonic Library)
  4. Do you have any existing instrument or sample libraries?
    If so, how big are they?
  5. Will the Mac always be used in a portable music setup, or mostly in one place?

To set the scene for your purchase, you may want consider the different ways you might use your Mac to create music, and in what settings:

  • Will you be recording real instruments? Does you sound interface use USB or Firewire? (MacBook Pro models all have Firewire. MacBook Air models don’t have Firewire.)
  • Will you be using the Mac at home, in a studio or at gigs? (If you’re moving around, smaller MacBooks are more convenient.)
  • Will you be using pre-recorded samples or loops? Will you be loading sampled instruments, e.g. Galaxy Steinway piano? (MacBook’s hard disks will generally be big enough to swallow lots of sample and instrument libraries. MacBook Airs have faster but smaller capacity flash storage – a consideration if you have a large amount of music tracks, software and samples.
  • Will you be using any special hardware, e.g. the Guitar Rig pedal. (Is your hardware compatible with Mac OS X Lion on new Macs?)
  • Will you be scoring music? Will you need to print sheet music? (Is your software compatible with Mac OS X Lion?)
  • Will you be using the Mac to play live? Might you do some live DJ’ing, mixing and beat matching (e.g. using Acid)? (Is your MacBook big enough for the screen to be useable, but small enough to be easy to carry around?)
  • Will you be making soundtracks? (If so, you’ll probably want a bigger screen to make room for the video track.)

My friend’s answer to these questions were:

I’m looking to use Ableton, with a portable set up and about 30GB worth of sounds/synths. I guess I would like bang for buck as opposed to spending for no reason, but if it’s worth it I will get it. Something that I would use live but I also travel a lot, so portability is important.

Here’s the good news. All Macs are great for music.

All the MacBooks are Good

All the current model MacBook Pro and MacBook Air models are good for making music.

So, really it’s a choice between:

  1. MacBook Air – 11 inch
  2. MacBook Air – 13 inch
  3. MacBook Pro – 13 inch
  4. MacBook Pro – 15 inch
  5. MacBook Pro – 17 inch

Let’s look at choosing between MacBook sizes first of all.

Choosing Between MacBook Air and MacBook Pro Sizes

In choosing between the sizes, there’s a trade off between three factors.

No. 1: How Big a Screen Do You Need for Making Music with Your Mac “On the Road”?

When making music, it’s great to have a big screen, so you can see and get straight to all your tracks and virtual instruments.

You’ll probably find the smaller screen MacBooks (MacBook Air 11″, MacBook Air 13″, MacBook Pro 13″) cramped for making music. They’ll be lots of scrolling and shuffling windows around.

You might be okay with a smaller screen if you’ve just recording a few live instruments or if your patient.

The 15 inch MacBook Pro screen is workable, and 17 inch MacBook Pro screen is good.

You don’t necessarily need a big screen on the laptop. If you’re mostly making music in one place, I’d recommend buy a 23 inch external thin HD screen for $170 that’s great to work off. (I have one! – cheap HD display for MacBook Air.)

No. 2: How Much Weight are You Prepared to Lug Around?

The 17 inch is a lot to lug around. I would not recommend travelling with it unless you really, really want a big screen.

I’ve travelled with a 15 inch every day for a year. I’m over it! It’s just big enough to be awkward.

If you can cope with the smaller screen, and you can get to a big screen when you want to work quickly, the 13 inch will be by far the best to travel with. It won’t take over your entire backpack!

No. 3: Do You Need the Power of a Quad Core CPU Versus a Dual Core CPU for Making Music?

The 13 inch MacBook Pro has two CPU cores. The 15 and 17 inch models have four CPU cores. This means that a 15 inch or 17 inch can handle roughly twice as many tracks as the 13 inch, before you need tricks like “freezing” or “bouncing” tracks to disk.

Still the 13 inch will handle a bunch of tracks. It will handle a bunch of virtual instruments, samples and recorded vocals and live instruments.

If you’re doing massive arrangements with 60 tracks and giant orchestral libraries with heaps of effects like convolution reverb, you’d really appreciate the quad core models (15 and 17 inch). Otherwise, you may not even notice the difference in power between a dual core and quad core.

No. 4: The Current MacBook Pro Models, and the Larger Screen MacBook Models May Be Quieter

Macs get hot from thinking hard, for example when playing back a 20 track music project with lots of virtual instruments and effects. When this happens, the fan runs to keep the processor from overheating. The harder the Mac works, the hotter it gets, and the faster the fan runs to compensate. The faster the fan runs the more noise the fan makes.

Since the heat also passively dissipates to the MacBook Air’s case, larger Macs may be able to sink more heat into the metal shell before the fan is seriously needed.

The current MacBook Air (the model released mid-2011) has a reputation of being a bit of a hot head. This may be because its the first generation of a processor technology from Intel that combines a Core i5 or i7 processor, with a graphics processor (HD3000 graphics) on one silicon chip. In the Pro, the processors are still on two separate chips, which may spread out the heat. Reports are the MacBook Air can get hot fast, even under moderate load. That means fan noise.

There is a fair bit of conjecture here: it hasn’t been measured, tested and proven that the Pro stays quieter longer than the Air. It hasn’t been proven that the smaller MacBooks need to fan earlier. I could be wrong.

I thought it’s better I mention it, as I have had a lot of people whinging about fan noise for the current model MacBook Air.

Best MacBook for Music – The Simple Answer

The “safe bet” for a MacBook Pro for easily-portable music production is a 15 inch MacBook Pro. The screen will be big enough, if not roomy, to work with. It’s okay to carry around. It’s got a quad core processor, so the technology is never likely to slow down your creativity – with a quad core you can have music projects with many, many tracks, virtual instruments and effects.

If you want really portable, and (i) if you can work off a big screen where you mainly create music, and (ii) if an 11 inch or 13 inch isn’t too small for you to create you’re out and about, and (iii) if you don’t have massively complicated music projects, you will probably fall in love with a MacBook Air 11″, MacBook Air 13″, or MacBook Pro 13″.

The MacBook Air is thinner, lighter, more portable than the MacBook Pro and has flash storage instead of hard disk. The flash storage (or solid state disk – SSD) is much faster than a hard disk, which is great for loading virtual instruments and music projects quickly. The downsize is flash storage is relatively expensive, so typical flash storage capacities are much less than hard disks. MacBook Air’s don’t have a built in DVD drive. If your music software comes on DVD, you’ll need to buy an external DVD drive from Apple ($79). You can read more about choosing a MacBook Air 11 vs 13.

If you want a big work space, don’t want to ever use an external monitor, and don’t care about lugging around a giant laptop, the MacBook Pro 17 inch is a amazing laptop for creativity. (It’s so wide, you can see your music tracks really well. It’s also great for doing video in the field, but that’s another story…)

The base models for all MacBook Pro sizes would serve your requirements well. For the MacBook Air’s, don’t buy the entry level model with 2GB of RAM and 64GB of flash storage. This will not be enough RAM or storage for most people making music with their Mac. All the other MacBook Air models have 4GB of RAM (good), with 128GB or 256GB of flash storage. If you don’t have a lot of music libraries you could get away with 128GB. If you’re a heavy user with lots of software, samples and virtual instruments, go for the 256GB. The cheaper i5 MacBook Air models have plenty of power for music; you can compare i7 vs i5 MacBook Air models here.

MacBook Air for a Music Production Setup?

You can use a MacBook Air for music. This is incredibly sexy, because the MacBook Air 11 inch weighs only one kilo. I throw a music keyboard, the Air and some portable speakers in a courier bag, and the Air handles a sample Fender Rhodes piano and a high-end sampled piano (Galaxy Steinway) in its stride.

I have the previous model MacBook Air, a late 2010 model, which has a more sluggish processor than the current model (a Core 2 Duo vs a Core i5 or i7), which has the advantage that it doesn’t get hot easily, so I haven’t gotten fan noise from just playing live. You may not want to use a late-2010 MacBook Air for serious multi-track music; it could struggle with a lot of tracks and effects. (Still you could freeze tracks to disk pretty easily.)

The MacBook Air 2011 / 2012 models (released 20 July 2011) have Intel Core i5 or i7 processors, making them up to 2.5 times faster than the previous models. A MacBook Pro 13 and a MacBook Air 13 have about the same music processing power. The MacBook Pro 15 & 17 have about double the music processing power of the 13 inch Air & Pro.

The i5 and i7 processors in the new MacBook Airs make them amazing for portable music! I never want to carry a MacBook Pro again. I can barely feel the weight of the MacBook Air in my backpack.

The MacBook Air has only two USB slots, so it can run an external music audio interface and a USB music keyboard at the same time.

If you won’t use an external monitor, the 13 inch Air would generally be a better choice than the 11 inch so you have enough “screen real estate” to work on your music.

Remember the caveat: Some people are complaining about fan noise from the current model MacBook Air.

Back to the MacBook Pro

All MacBook Pros come with at least 4GB of memory, which is great for music production. Typically only complex music projects, for example projects with many sampled instruments, would benefit from upgrading to 8GB of memory.

Most professional music producers end up with a lot of virtual instruments and sample libraries, as well as a big iTunes library of music. If this could be you, you may want to get the hard disk upgraded to the biggest size.

If you’re a speed freak (like me), and you love your music projects and virtual instruments to load very quickly, a solid state disk (SSD) is wonderful. As SSDs have no moving parts, they can get to samples in virtual instruments much faster, so an SSD can support more sampled instruments. SSDs are still quite expensive, particularly if you buy them as a factory option from Apple, instead of aftermarket. They also typically have lower storage capacities than hard disks. Think of an SSD as a high-end or luxury option for a music rig.

Is Your Music Software OS X Lion Compatible?

New Macs all come with OSX Lion, which is relatively new. Not all music software has been updated to be fully compatible with Lion yet. Check the music software’s website or Google for up-to-date information on compatible. For example, you can Google “propellerheads reason lion compatible” to find a webpage to answer if Reason is compatible with Lion.

If you’re buying a new Mac, make sure your music software runs properly on OS X Lion.

Save Money on New MacBooks

If you’d like to save money on new MacBooks, check out the prices here:

Look out for Mac laptops with free shipping.

Extra Tips

  1. For travel get a small and light external two channel audio interface to connect mics or instruments. (Or four channel, if you need it.)
  2. High end audio interfaces tend to use Firewire instead of USB. I’ve found Firewire interfaces to be more reliable and responsive than USB. There are posts on the net to back this up like this one. Apparently USB has been getting better over the years. If you buy a MacBook Pro, you’re in luck, because the MacBook Pro has both USB ports and a Firewire port, so you’ve got the option if you need it. (The MacBook Air doesn’t have a Firewire port built in. There’s plans for a 3rd party Firewire interface using the Thunderbolt port.) Firewire sound interfaces will typically only be relevant if you want to record 8+ tracks at once, or if you want super high quality recording or if you’ve got concert pianist like sensitivity to how quickly sounds play when you press keys.
  3. I love Presonus audio interfaces. I have one of their eight channel interfaces. They’re famous for having great mic preamps. Not cheap, but great quality.
  4. Rode Mic are an Australian microphone company who make very good quality mics at a great price. Registered mics get a ten year guarantee. I’ve had two of their mics. Highly recommended.
  5. M-Audio make good, cheap, light music keyboards with great feel. They plug straight into the Macs USB port. I have one. You can buy them in three sizes (49, 61 and 88 keys). Avoid the eKeys models – they’re not velocity sensitive (i.e. you can’t play softer by just press the keys more lightly).
  6. I recommending avoiding Behringer keyboards – the graduation between soft notes and loud notes is very sudden and natural.
  7. If you shop around on the Internet, you can find much better prices on audio interfaces, mics and keyboards than list price.

Do you want to get a studio quality sound? Then check out the Eight Essential Keys to Great Recordings.

Hope this helps you get a great MacBook for making music!

If you found this article helpful, could you please click the +1, Like or other sharing buttons. It only takes a moment! This helps this article get found ahead of old, out of date articles, and helps MacCrazy.com compete with powerful, established corporate-owned sites. Thanks!